Table of Contents
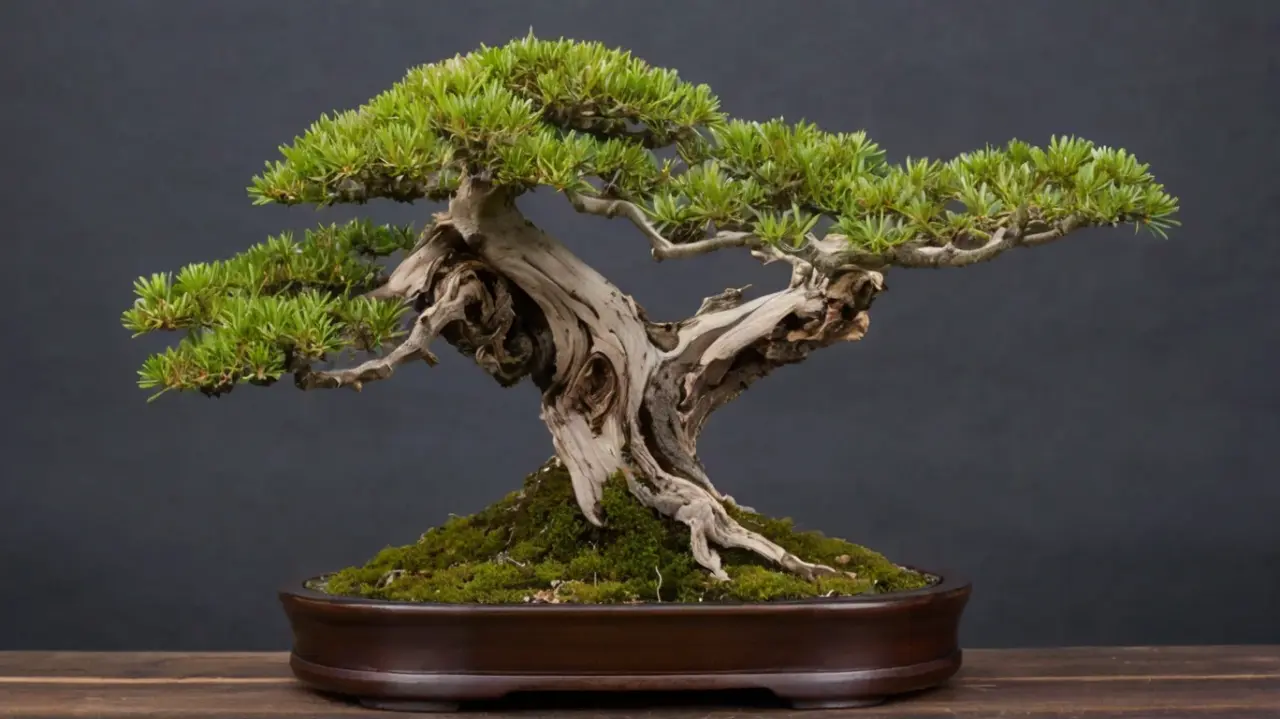
Deadwood on bonsai—whether it’s Jin, Shari, or Uro—can add a ton of character to your tree. Here’s the breakdown:
- Jin: This is when a branch is stripped bare of bark.
- Shari: This refers to a part of the trunk that’s barkless.
- Uro: This is a hollow, irregular wound in the trunk.
In nature, deadwood forms when a tree is struck by lightning, goes through a long drought, or when branches snap from ice, wind, or heavy snow. The exposed wood then dies off and gets bleached by the sun.
This technique is almost always used on evergreen trees. On deciduous trees, creating Jin or Shari can look off because the deadwood tends to rot away over time. However, Uro is often found naturally on deciduous trees.
When to Create Deadwood on Bonsai? The best time to create deadwood on your bonsai is in early spring or late summer. During these periods, the tree will heal any wounds from the process quickly.
How to Create Deadwood on Bonsai Trees
Deadwood on Bonsai is a stunning feature, but getting that natural look takes skill. If you’re just starting, it’s best to practice before working on your prized trees. The right tools are key—think Jin pliers, graving tools, and Lime sulfur, which you can easily find at most online Bonsai shops.
Creating a Jin on Bonsai
- Strip the Bark: Start by removing the bark from the branch, leaving only the hardwood exposed.
- Shape the Wood: Use Jin pliers to peel away thin strips of wood, then cut them off at the end of your desired Jin.
- Smooth the Edges: Once you have the basic shape, smooth out any sharp edges with either a concave cutter or some sandpaper.
- Bleach and Preserve: If you want to bleach the Jin and prevent rot, apply Lime sulfur to the wood. Give it a night to dry properly.
Creating a Shari on Bonsai
Crafting Shari Deadwood on Bonsai is no small task. It’s not just about picking a spot that looks good, but also ensuring you’re not cutting off vital nutrients to the branches above.
Before you even think about removing bark, grab some chalk and sketch out the shape of the Shari directly on the trunk.
Here’s the deal:
- Take your time. This process should be spread out over several months, maybe even years.
- Start with a narrow strip of bark and gradually widen it in stages. Slow and steady wins the race here.
- Use a sharp knife to cut through the bark, then tear it down with Jin pliers.
- Once you’ve got the shape you want, hollow out the trunk slightly with a concave cutter or graving tools.
Next, it’s time to bleach the Shari. Brush on some Lime sulfur. This not only bleaches the deadwood but also shields your Bonsai from infections.
Refining the Barkless Branch
This bonsai already has a barkless branch, but to enhance its aesthetic, it needs to be refined and shortened. Here’s how you can do it:
- Twisting with Jin Pliers:
- Instead of just snipping away with scissors, use Jin pliers to twist the branch fibers.
- This technique makes the deadwood look as though it naturally aged and weathered over time.
- By twisting the fibers before peeling, you create a more textured and natural appearance, which is far superior to a clean cut.
- Before Twisting and Peeling:
- Examine the branch carefully. Decide where you want the Jin to end and how much of the branch you want to peel away.
- The goal is to make it look like a natural part of the tree’s history, as though the branch died back on its own.
- After Twisting and Peeling:
- Once you’ve twisted and peeled the branch, take a moment to assess the results.
- The fibers should have a rugged, aged look, adding depth and realism to the bonsai’s appearance.
Creating Shari for Enhanced Character
Creating Shari involves removing strips of bark to expose the wood beneath, giving the tree a sense of age and struggle against the elements.
- Starting the Shari:
- Begin by selecting the area where you want the Shari to appear. This is usually on the trunk or a significant branch.
- You’ll often see the Shari on one side, with the live bark on the other, creating a stark contrast that highlights the tree’s resilience.
- Using a Sharp Knife:
- With a very sharp knife, start by making a shallow cut into the bark. Follow the live vein upwards from the base of the tree.
- Gradually peel away the bark to reveal the wood underneath. Take your time with this step to ensure precision and avoid damaging the live parts of the tree.
- Continue removing the bark until you’re satisfied with the look. The exposed wood should follow the natural lines of the tree.
- Continuing the Shari into the Soil:
- For a truly natural appearance, extend the Shari down into the root base. This makes it seem like the tree’s deadwood feature runs deep, anchoring it firmly in the earth.
- Close-up views of the root base show how the Shari seamlessly blends into the soil, reinforcing the idea that this feature is as old as the tree itself.
Refining the Deadwood on Bonsai: Finishing Touches
To really bring out the aged look of your bonsai’s deadwood, you’ll need to refine the wood after creating the Shari and Jin.
- Making the Deadwood on Bonsai Look Older:
- Use tools like concave cutters and sandpaper to smooth out rough edges and refine the shape of the deadwood.
- Bleaching Wood: Consider applying lime sulfur to the exposed wood to bleach it, giving it an older, weathered appearance. This also helps preserve the wood and protect it from decay.
- Chalk for Texture: Rubbing chalk into the grooves can help to enhance the texture and contrast of the deadwood, making it stand out more.
- Aim for a balance between ruggedness and refinement. The deadwood should look old, but not neglected.
- Final Checks:
- Step back and view your bonsai from different angles to ensure the deadwood looks natural from all perspectives.
- Make adjustments as needed, whether it’s refining the shape further or adding more texture with your tools.
Creating Jins from Larger Branches
When you’re pruning bigger branches on your Bonsai, think about turning them into Jins.
Jins are a great way to add character and drama to your tree.
- Experiment with Jins: You can always remove a Jin later if it doesn’t work out.
- Tools to Use: Consider using Jin pliers or a sharp knife for shaping.
- Enhancing Your Tree: Jins can give your Bonsai a unique look and enhance its natural deadwood.
By carefully creating Jin and Shari, and refining them with attention to detail, you can transform your bonsai into a living piece of art. These techniques, when executed well, add depth, character, and a story of resilience to your tree, making it not just a plant, but a testament to nature’s beauty and power.
▶Click Here to download this article as PDF
